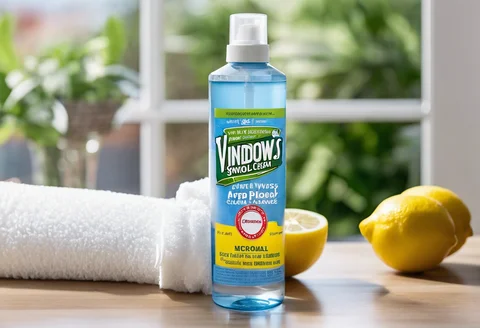
Introduction to Homemade Vinyl Window Cleaner
Vinyl windows are a popular choice for many homeowners due to their durability and energy efficiency. However, keeping them clean can sometimes be a challenge. Commercial window cleaners often contain harsh chemicals that can be damaging to the environment and expensive to purchase regularly. Making your own homemade vinyl window cleaner is a cost-effective and eco-friendly alternative that can leave your windows sparkling clean.
In this step-by-step guide, you will learn how to create a simple yet effective DIY vinyl window cleaner using common household ingredients. By making your own cleaner, you can customize the solution to fit your preferences and avoid the use of harmful chemicals. Follow the instructions carefully to ensure that your vinyl windows are left streak-free and looking their best.
By the end of this guide, you will have the knowledge and confidence to make your own homemade vinyl window cleaner whenever you need to freshen up your windows. Save money, protect the environment, and enjoy the satisfaction of knowing exactly what is in the cleaning solution you are using on your vinyl windows.
Understanding the Ingredients and Supplies Needed
- The primary ingredients for making homemade vinyl window cleaner include white vinegar, water, and dish soap.
- White vinegar is a key component due to its cleaning and disinfecting properties.
- Water is essential for diluting the solution and ensuring it is safe for use on windows.
- Dish soap helps to break down dirt and grime on the windows effectively.
Supplies needed:
- Spray bottle: Choose a clean spray bottle that will make it easy to apply the cleaner to the windows.
- Microfiber cloth or squeegee: These tools will help in wiping down the windows and ensuring a streak-free finish.
- Funnel: A funnel will assist in pouring the ingredients into the spray bottle without spills.
- Measuring cup or measuring spoons: Using precise measurements will ensure the effectiveness of the cleaner.
- Labels (optional): Labels can be used to clearly mark the spray bottle to avoid confusion with other cleaning solutions.
It is important to gather and organize all the ingredients and supplies before starting the process of making the homemade vinyl window cleaner. This will ensure a smooth and efficient cleaning experience.
Safety Precautions and Tips
- Ventilation: Ensure good ventilation when working with homemade vinyl window cleaner to avoid inhaling fumes.
- Protective Gear: Wear gloves and safety goggles to protect your skin and eyes from any potential splashes or irritation.
- Labeling: Always label the container with the contents and date to avoid confusion and accidental ingestion.
- Keep Out of Reach: Store the cleaner out of reach of children and pets to prevent accidental ingestion.
- Avoid Mixing Chemicals: Do not mix the homemade vinyl window cleaner with other cleaning products as it may create harmful fumes.
- Testing: Test the cleaner on a small, inconspicuous area of the window first to ensure compatibility and prevent damage.
- Avoid Direct Sunlight: Clean windows on a cloudy day or when they are not in direct sunlight to prevent streaking.
- Proper Disposal: Dispose of any leftover cleaner properly according to local regulations for household hazardous waste.
- Emergency Procedures: In case of accidental ingestion or contact with eyes, seek medical attention immediately.
By following these safety precautions and tips, you can effectively and safely clean your vinyl windows with the homemade cleaner.
Step 1: Gathering the Necessary Ingredients and Supplies
To prepare homemade vinyl window cleaner, gather the following ingredients and supplies before getting started:
- White vinegar: White vinegar is an essential component for making an effective window cleaner. It helps to cut through grease and grime on your vinyl windows.
- Dish soap: Choose a gentle dish soap that will help to clean the windows without leaving behind streaks or residue.
- Rubbing alcohol: Rubbing alcohol is an excellent ingredient for removing tough stains and disinfecting the windows.
- Water: Distilled water is best for creating a streak-free cleaning solution.
- Spray bottle: A clean spray bottle will be needed to mix and store your homemade window cleaner.
- Microfiber cloth or squeegee: Invest in a high-quality microfiber cloth or squeegee to ensure a streak-free finish on your vinyl windows.
Having these ingredients and supplies on hand will make the window cleaning process smoother and more efficient. By gathering everything you need beforehand, you’ll be ready to move on to the next steps of creating your homemade vinyl window cleaner.
Step 2: Mixing the Cleaning Solution
- Gather Ingredients:
- Collect white vinegar, water, and dish soap to create the cleaning solution. Make sure the vinegar is distilled white vinegar for best results.
- Prepare the Container:
- Get a spray bottle or a container with a tight-fitting lid to store the cleaning solution. Ensure that the container is clean and free from any residue of previous substances to maintain the effectiveness of the solution.
- Measure the Ingredients:
- In a clean measuring cup, combine 2 cups of water with 1/4 cup of white vinegar. Add a few drops of dish soap. These measurements ensure a balanced solution that is effective in cleaning vinyl windows.
- Mix the Solution:
- Pour the water into the container first, followed by the white vinegar. Add the dish soap slowly to avoid excessive bubbles. Gently swirl or shake the container to mix the ingredients thoroughly. Avoid shaking too vigorously to prevent excessive foaming.
- Adjust the Strength:
- For tougher stains, you can increase the vinegar concentration slightly. Conversely, if the solution leaves streaks on the windows, dilute it with more water. Finding the right balance may require some experimentation.
- Label the Container:
- To avoid confusion, label the container with the contents and the date it was made. This step is essential for safety and future use.
By following these steps, you can effectively mix a cleaning solution for your vinyl windows that is both safe and efficient.
Step 3: Preparing the Application Tools
- Gather all the necessary tools and materials before starting to make homemade vinyl window cleaner.
- Ensure you have a clean spray bottle that is specifically designated for cleaning solutions, to avoid contamination or mixing with other substances.
- Have a measuring cup or funnel handy for accurate measurements of ingredients.
- Prepare a clean microfiber cloth or squeegee for wiping and drying the windows after applying the cleaner.
- If using essential oils for fragrance, have them ready along with a dropper for easy dispensing.
- Keep a sheet of labels and a permanent marker nearby to properly label the spray bottle for identification.
It is essential to have all the tools in place before proceeding with making the homemade vinyl window cleaner. Having them organized and prepared will streamline the process and ensure an efficient and effective cleaning solution for your windows.
Step 4: Pre-cleaning the Window Surface
Before applying the homemade vinyl window cleaner, it is crucial to pre-clean the window surface thoroughly to ensure optimal results. Follow these steps to prepare the surface effectively:
- Remove Debris: Begin by removing any loose dirt, dust, or debris from the window surface. Use a soft brush or dry cloth to gently sweep away these particles. This step will prevent them from scratching the window during the cleaning process.
- Prepare a Cleaning Solution: Create a basic cleaning solution by mixing warm water with a small amount of mild dish soap. Avoid using harsh chemicals or abrasive cleaners, as they can damage the vinyl surface.
- Wash the Window: Dip a clean microfiber cloth or sponge into the soapy water solution. Wipe the entire window surface, paying close attention to corners and edges where dirt and grime tend to accumulate. For stubborn spots, gently scrub with a soft-bristled brush.
- Rinse Thoroughly: After cleaning the window, rinse off the soap residue using clean water. This step is essential to prevent streaks and ensure a clear, sparkling finish.
- Dry the Surface: Use a clean, dry microfiber cloth or squeegee to remove excess water from the window surface. Wipe in a top-to-bottom or side-to-side motion to prevent streaking.
By pre-cleaning the window surface before applying the homemade vinyl window cleaner, you will create a clean canvas for the cleaning solution to work effectively. This step helps remove dirt, grime, and residue that can hinder the cleaning process and ensures a streak-free shine on your vinyl windows.
Step 5: Applying the Homemade Vinyl Window Cleaner
Once the homemade vinyl window cleaner solution has been prepared, it is time to apply it effectively to achieve sparkling clean windows. Follow these steps to ensure the best results:
- Prepare Your Supplies: Gather a spray bottle filled with the homemade vinyl window cleaner, a clean microfiber cloth, and a squeegee if preferred.
- Spray the Solution: Liberally spray the homemade cleaner onto the vinyl windows. Ensure full coverage but avoid oversaturating the surface.
- Wipe with a Cloth: Use a clean microfiber cloth to wipe the solution in circular motions across the window surface. This helps to loosen dirt and grime effectively.
- Use a Squeegee (Optional): For a streak-free finish, consider using a squeegee to remove the cleaner from the window. Start at the top and work your way down in a smooth, continuous motion.
- Pay Attention to Corners and Edges: Use the cloth or a cotton swab to reach and clean any stubborn dirt in the corners and edges of the window.
- Repeat if Necessary: For heavily soiled windows, repeat the process until the desired level of cleanliness is achieved.
- Buff for Shine: Once the windows are clean, use a dry microfiber cloth to buff the surface for a shiny finish and to remove any remaining streaks.
By following these steps, one can effectively apply the homemade vinyl window cleaner to achieve spotless and streak-free windows, enhancing the overall appearance of the home or workspace.
Step 6: Wiping and Drying the Window Surface
After applying the homemade vinyl window cleaner solution, the next step is to wipe down the window surface thoroughly. Use a clean microfiber cloth or paper towels to wipe the solution off the window. Make sure to remove all traces of the cleaner to prevent streaks or residue from forming on the glass.
- Wipe in a Top to Bottom Motion: Start wiping from the top of the window and move downwards in a consistent motion. This method helps prevent drips and streaks from forming on the glass surface.
- Check for Streaks: After wiping the window, inspect it for any streaks or spots that may have been left behind. If you notice any streaks, use a dry cloth to buff them out gently.
- Dry the Window Surface: To finish the cleaning process, use a separate clean and dry microfiber cloth to dry the window completely. This step will help prevent water spots or streaks from forming as the window dries.
- Inspect the Window: Take a final look at the window to ensure that it is clean and streak-free. If you notice any remaining spots or streaks, touch up those areas with a clean, dry cloth.
Remember, proper wiping and drying of the window surface are crucial to achieving a streak-free finish. By following these simple steps, you can ensure that your vinyl windows are clean and crystal clear, allowing natural light to brighten up your living spaces effectively.
Step 7: Inspecting and Touching Up Any Spots
Inspecting the windows after cleaning is crucial to ensure that all dirt and grime have been effectively removed. Check for any remaining spots or streaks on the glass surface that may need extra attention. This step will guarantee that your windows are left sparkling clean.
- Use a Microfiber Cloth: Wipe the windows with a clean, dry microfiber cloth to touch up any remaining spots or streaks. The soft texture of the microfiber will help to remove any lingering dirt or cleaning solution residue without leaving behind lint or streaks.
- Dab of Vinegar: For stubborn spots or streaks, moisten a corner of the microfiber cloth with a small amount of vinegar. Gently rub the affected area in circular motions to lift off the residue. Vinegar’s acidic properties help to tackle tough stains without damaging the window surface.
- Buffing Motion: After addressing any spots or streaks, use a separate dry microfiber cloth to buff the windows to a brilliant shine. Utilize a circular or back-and-forth motion to remove any remaining cleaning solution and leave the glass gleaming.
- Natural Light Inspection: To ensure no spots are missed, inspect the windows under natural light from different angles. Sunlight will reveal any overlooked streaks or residue, allowing you to target and touch up those areas effectively.
By meticulously inspecting and touching up any spots on your windows, you can achieve a pristine finish and enjoy crystal-clear views through your freshly cleaned vinyl windows.
Tips for Maintaining Clean Vinyl Windows
- Regular Cleaning: Make it a habit to clean your vinyl windows regularly to prevent build-up of dirt and grime.
- Use Gentle Cleaners: Avoid harsh chemicals that can damage the vinyl material. Stick to homemade or gentle commercial cleaners.
- Soft Cleaning Tools: Opt for soft microfiber cloths or sponges to avoid scratching the window surface.
- Avoid Abrasive Tools: Stay away from abrasive materials like steel wool or rough brushes that can cause damage.
- Clean Tracks and Frames: Don’t forget to clean the window tracks and frames along with the glass for a thorough job.
- Check for Mold: Keep an eye out for any signs of mold or mildew and address it promptly to prevent it from spreading.
- Maintain Seals: Check the seals around the windows regularly and replace any damaged ones to prevent leaks.
- Wipe Dry: After cleaning, make sure to thoroughly dry the windows with a clean towel to prevent water spots.
“Proper maintenance and regular cleaning are key to keeping your vinyl windows looking great and functioning efficiently.”
Common Mistakes to Avoid
- Using Abrasive Materials: Avoid using rough or abrasive materials like steel wool to clean vinyl windows, as they can scratch the surface and damage the window.
- Skipping the Rinse: It is crucial to thoroughly rinse the window after cleaning to prevent streaks and residue from forming on the surface.
- Using Harsh Chemicals: Refrain from using harsh chemicals such as bleach or ammonia on vinyl windows, as they can cause discoloration or damage.
- Not Testing on a Small Area: Always test a small inconspicuous area of the window first before applying the homemade cleaner to ensure that it does not cause any adverse reactions.
- Using Too Much Cleaner: Using an excessive amount of cleaner can leave streaks on the window surface. Apply the cleaner sparingly and buff it off with a clean cloth.
- Neglecting to Dry Thoroughly: After cleaning, make sure to dry the window completely with a dry, lint-free cloth to avoid water spots or streaks.
Remember, avoiding these common mistakes will help you achieve clean and sparkling vinyl windows without causing any damage.
Alternative Recipes and Variations
- For a citrus-infused cleaner, substitute the white vinegar with fresh lemon juice. The acidic properties of the lemon juice will help cut through grime and leave a fresh scent.
- Add a few drops of essential oils such as lavender, tea tree, or peppermint to give your vinyl window cleaner a personalized scent and an added antibacterial boost.
- For a stronger cleaning solution, mix equal parts of vinegar and rubbing alcohol. This combination will help tackle stubborn stains and leave your windows sparkling.
- If you prefer a foam-based cleaner, mix dish soap with warm water until it becomes frothy. Apply the foam to the windows and wipe off with a microfiber cloth for a streak-free finish.
- Experiment with different ratios of water to vinegar to find the perfect balance for your cleaning needs. Some may find a stronger vinegar solution more effective, while others prefer a milder concoction for regular maintenance.
- Consider adding a teaspoon of cornstarch to the mixture for extra cleaning power. The cornstarch helps to break down dirt and grime, especially on textured or deeply soiled window surfaces.
These alternative recipes and variations allow you to customize your homemade vinyl window cleaner to suit your preferences and cleaning requirements. Feel free to tweak the ingredients and ratios to find the perfect formula for achieving spotless, streak-free windows every time.
Using Essential Oils for Scented Vinyl Window Cleaner
Using essential oils in your homemade vinyl window cleaner is a great way to add a pleasant scent while harnessing the natural cleaning power of these oils. Here’s how to incorporate essential oils into your DIY cleaning solution:
- Selecting Essential Oils:
- Choose essential oils with antiseptic properties such as tea tree, lavender, lemon, eucalyptus, or peppermint.
- Consider the scent you prefer and how it will complement your cleaning routine.
- Adding Essential Oils:
- Add 10-15 drops of your chosen essential oil to the homemade vinyl window cleaner recipe during the mixing process.
- Be cautious not to use too much, as essential oils are concentrated and a little goes a long way.
- Mixing the Solution:
- Blend the essential oils into the cleaning solution thoroughly to ensure an even distribution of the scent.
- Stir gently to avoid creating too many bubbles in the mixture.
- Benefits of Essential Oils:
- Essential oils not only provide a pleasing fragrance but can also offer additional cleaning and disinfecting benefits.
- Many essential oils have antibacterial, antifungal, and antiviral properties, enhancing the cleaning power of your homemade vinyl window cleaner.
- Storage and Usage:
- Store your scented vinyl window cleaner in a dark glass spray bottle to protect the essential oils from light exposure.
- Shake well before each use to ensure the essential oils are evenly dispersed in the solution.
By incorporating essential oils into your homemade vinyl window cleaner, you can create a delightful cleaning experience that leaves your windows sparkling and your home smelling fresh and inviting.
Environmental Benefits of Homemade Cleaners
- Homemade cleaners are typically made with natural ingredients such as vinegar, baking soda, and essential oils.
- These ingredients are non-toxic and biodegradable, making them safer for the environment compared to harsh chemical cleaners.
- By using homemade cleaners, individuals can reduce their carbon footprint by decreasing the amount of packaging and transportation required for commercial cleaning products.
- Homemade cleaners also help minimize indoor air pollution since they do not contain harmful chemicals that can off-gas and contribute to poor air quality.
- Utilizing homemade cleaners promotes sustainability by encouraging the use of reusable spray bottles and containers instead of single-use plastic bottles.
- Making homemade cleaners allows individuals to customize the scents and ingredients to suit their preferences, reducing the need for multiple specialized cleaning products.
- Choosing homemade cleaners over store-bought options helps reduce plastic waste and minimizes the impact of harmful chemicals on ecosystems when disposed of down the drain.
- Overall, incorporating homemade cleaners into one’s cleaning routine can contribute to a healthier home environment and a more sustainable way of cleaning.
FAQs about Homemade Vinyl Window Cleaner
- Can I use homemade vinyl window cleaner on other surfaces besides vinyl windows? Generally, homemade vinyl window cleaner is safe to use on other glass surfaces such as mirrors or glass tabletops. However, it is always recommended to test a small, inconspicuous area first to ensure compatibility with the specific surface.
- Is homemade vinyl window cleaner safe for the environment? Yes, homemade vinyl window cleaner is typically made from simple, environmentally-friendly ingredients like vinegar and water, making it a safer alternative to commercial cleaners that may contain harsh chemicals. It is a more sustainable option that reduces exposure to toxic substances.
- How often should I clean my vinyl windows with homemade cleaner? The frequency of cleaning will depend on factors like the location of your windows and the amount of dirt they are exposed to. In general, a thorough cleaning with homemade vinyl window cleaner every one to two months should help maintain their appearance and prolong their lifespan.
- Can I use scented oils or essential oils in homemade vinyl window cleaner for a pleasant fragrance? While adding scented oils may seem appealing, it is best to avoid them in homemade vinyl window cleaner. Some oils can leave behind residue or streaks on the windows, affecting the cleaning results. It is recommended to stick to the basic ingredients for optimal cleaning performance.
- Is homemade vinyl window cleaner cost-effective compared to store-bought cleaners? Yes, homemade vinyl window cleaner is typically more cost-effective than store-bought alternatives. The ingredients used are inexpensive and readily available in most households, making it a budget-friendly option for regular window cleaning.
Conclusion and Final Thoughts
- The homemade vinyl window cleaner is an effective and eco-friendly solution for maintaining clean and streak-free windows.
- By following the step-by-step guide provided, users can create their own cleaner using simple household ingredients.
- It is essential to mix the ingredients thoroughly to ensure the solution is well-balanced for optimal cleaning results.
- Regularly cleaning windows not only improves the overall appearance of the home but also helps extend the lifespan of the windows.
- The use of white vinegar in the cleaner provides disinfecting properties, making it a versatile and efficient cleaning solution.
- Adding essential oils not only enhances the fragrance of the cleaner but also offers additional cleaning benefits.
- Remember to label the homemade cleaner properly and store it in a cool, dark place away from direct sunlight.
- Always perform a patch test on a small area of the window before full application to ensure compatibility with the surface.
- This DIY cleaner is a cost-effective alternative to commercial window cleaners without compromising on performance.
- Embrace the satisfaction of creating a homemade cleaning solution that is safe for your family, pets, and the environment.
Feel free to explore your creativity by experimenting with different essential oil combinations to personalize the fragrance of your homemade vinyl window cleaner. Enjoy the clean and clear view through your windows with this simple and effective DIY solution.